Blog

  • Black Bean Mole Burgers – A Flavor-Packed Twist on the Classic Veggie Burger

    Black Bean Mole Burgers – A Flavor-Packed Twist on the Classic Veggie Burger

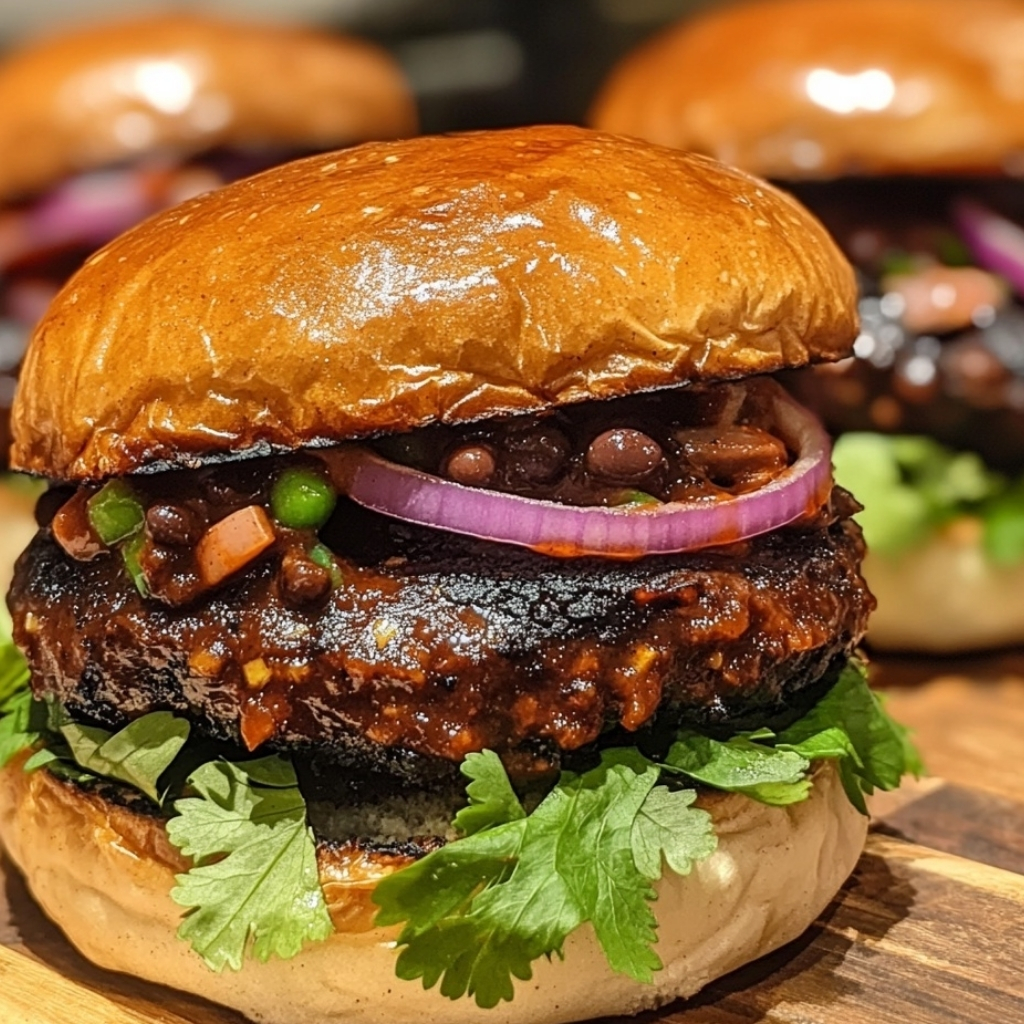
    If you’re looking for a plant-based burger that doesn’t compromise on flavor or texture, these Black Bean Mole Burgers are the perfect solution. Infused with the rich, smoky, and slightly spicy notes of traditional Mexican mole sauce, these burgers deliver a gourmet experience that’s both hearty and satisfying.

    Perfect for vegetarians and meat-lovers alike, this recipe combines black beans, spices, cocoa, and a touch of chili for a deep, complex flavor that stands out from typical veggie patties. Serve them on toasted buns with avocado, fresh lettuce, and a drizzle of mole sauce for an unforgettable meal.

    Ingredients

    Makes 6 burgers

    For the Burgers:

    • 2 cans (15 oz each) black beans, drained and rinsed
    • 1/2 cup finely chopped onion
    • 2 cloves garlic, minced
    • 1/4 cup breadcrumbs (use gluten-free if desired)
    • 1 egg (or flax egg for vegan option)
    • 2 tablespoons cocoa powder (unsweetened)
    • 1 tablespoon chili powder
    • 1 teaspoon ground cumin
    • 1 tablespoon tomato paste
    • 1 tablespoon olive oil
    • Salt and black pepper to taste

    For the Mole Sauce (optional but recommended):

    • 2 tablespoons olive oil
    • 2 tablespoons unsweetened cocoa powder
    • 1 tablespoon peanut butter or almond butter
    • 1 teaspoon chili powder
    • 1/2 teaspoon cinnamon
    • 1/2 cup vegetable broth
    • 1 tablespoon honey or agave syrup

    Preparation Time

    • Prep time: 15 minutes
    • Cooking time: 20 minutes
    • Total time: 35 minutes

    Step-by-Step Instructions

    Step 1: Prepare the Burger Mixture

    1. In a large bowl, mash the black beans with a fork or potato masher until mostly smooth but slightly chunky.
    2. Add the chopped onion, garlic, breadcrumbs, egg, cocoa powder, chili powder, cumin, tomato paste, salt, and pepper.
    3. Mix thoroughly until all ingredients are combined and the mixture holds together.

    Step 2: Form the Patties

    1. Divide the mixture into six equal portions and shape each into a patty about 1/2 inch thick.
    2. Place the patties on a parchment-lined tray and refrigerate for 10–15 minutes to firm up.

    Step 3: Cook the Patties

    1. Heat olive oil in a skillet over medium heat.
    2. Cook the patties for about 4–5 minutes per side, until crispy and browned on the outside and heated through.

    Step 4: Make the Mole Sauce

    1. In a small saucepan, heat olive oil over medium heat.
    2. Add cocoa powder, nut butter, chili powder, and cinnamon, stirring constantly for 30 seconds.
    3. Add vegetable broth and honey, whisking until smooth. Simmer for 2–3 minutes until slightly thickened.

    Step 5: Assemble the Burgers

    1. Toast your burger buns and layer with lettuce, tomato, and avocado slices.
    2. Place the mole-flavored black bean patty on top and drizzle with the warm mole sauce.
    3. Serve immediately with a side of roasted potatoes or a crisp salad.

    Serving Suggestions

    • Pair with sweet potato fries or grilled corn for a complete meal.
    • Add pickled jalapeños or red onions for a tangy kick.
    • For extra richness, spread a thin layer of chipotle mayo or guacamole on the buns.
    • Serve with a cold glass of lime-infused sparkling water or light lager for balance.

    Nutritional Highlights

    NutrientPer Serving (1 burger with bun)
    Calories310
    Protein12 grams
    Total Fat10 grams
    Saturated Fat2 grams
    Carbohydrates42 grams
    Sugars6 grams
    Fiber9 grams
    Sodium420 milligrams

    Nutritional Notes:

    • Black beans are rich in plant-based protein, fiber, and iron, making this a filling yet healthy meal.
    • Cocoa powder and chili add antioxidants and metabolism-boosting benefits.
    • Olive oil provides heart-healthy monounsaturated fats.
    • This burger offers a lower-fat alternative to traditional beef burgers without sacrificing flavor.

    Tips for Perfect Burgers

    • Don’t over-mash the beans — leaving some chunks helps with texture.
    • For extra crispiness, bake the patties at 400°F (200°C) for 20 minutes instead of pan-frying.
    • Make a double batch and freeze uncooked patties between parchment sheets for up to 2 months.
    • Warm frozen patties directly in a skillet or oven for quick weekday meals.

    Variations to Try

    • Add corn kernels or finely chopped bell peppers for more texture.
    • Replace breadcrumbs with rolled oats for a gluten-free version.
    • Use vegan cheese slices or cashew cream instead of mole sauce for a different twist.
    • Make sliders for party appetizers using mini buns.

    The Black Bean Mole Burger is a true celebration of bold, earthy flavors and satisfying texture. Whetheryou’re embracing Meatless Mondays, looking to eat healthier, or simply love gourmet-style meals at home, this recipe delivers on every level.

    Packed with protein, fiber, and rich spices, it’s a wholesome, delicious, and easy-to-make dish that will have everyone asking for seconds.

  • Cheesy Cabbage Casserole – A Comforting and Flavorful Family Favorite

    Cheesy Cabbage Casserole – A Comforting and Flavorful Family Favorite

    When it comes to cozy, satisfying meals, few dishes deliver as much comfort as a Cheesy Cabbage Casserole. This hearty recipe transforms humble cabbage into a creamy, cheesy masterpiece that’s perfect for weeknight dinners, potlucks, or holiday side dishes.

    With layers of tender cabbage, melted cheese, and a golden, bubbly top, this casserole strikes the ideal balance between wholesome and indulgent. Even those who think they don’t love cabbage will be asking for seconds!

    Ingredients

    Serves 6–8

    • 1 medium head of cabbage (about 6 cups), chopped
    • 1 medium onion, finely chopped
    • 2 tablespoons butter
    • 1 cup shredded cheddar cheese (plus ¼ cup for topping)
    • 1/2 cup shredded mozzarella cheese
    • 1 cup sour cream
    • 1/2 cup mayonnaise
    • 2 cloves garlic, minced
    • 1 teaspoon salt
    • 1/2 teaspoon black pepper
    • 1/2 teaspoon paprika
    • 1/4 cup breadcrumbs (optional, for topping)

    Preparation Time

    • Prep time: 15 minutes
    • Cooking time: 30 minutes
    • Total time: 45 minutes

    Step-by-Step Instructions

    Step 1: Prepare the Cabbage

    1. Preheat your oven to 375°F (190°C).
    2. Bring a large pot of salted water to a boil.
    3. Add chopped cabbage and cook for about 5 minutes, until just tender. Drain well and set aside.

    Step 2: Sauté the Aromatics

    1. In a large skillet, melt the butter over medium heat.
    2. Add chopped onion and garlic, cooking until translucent and fragrant (about 3 minutes).

    Step 3: Mix the Creamy Base

    1. In a large bowl, combine sour cream, mayonnaise, cheddar cheese, mozzarella cheese, salt, pepper, and paprika.
    2. Stir until smooth and evenly blended.

    Step 4: Combine and Assemble

    1. Add the cooked cabbage and sautéed onions to the cheese mixture. Stir gently to coat all the cabbage pieces evenly.
    2. Transfer the mixture into a greased baking dish.
    3. Sprinkle the remaining cheese and optional breadcrumbs evenly on top.

    Step 5: Bake

    1. Bake uncovered for 25–30 minutes, or until the top is golden and bubbly.
    2. Allow it to cool slightly before serving.

    Serving Suggestions

    • Serve alongside roasted meats, baked chicken, or fish for a balanced dinner.
    • Enjoy as a hearty vegetarian main dish with a side salad.
    • Sprinkle with chopped herbs (like parsley or chives) before serving for freshness.
    • Perfect for meal prep — simply reheat for a quick, satisfying lunch.

    Nutritional Highlights

    NutrientPer Serving (1/8 of casserole)
    Calories260
    Protein8 grams
    Total Fat22 grams
    Saturated Fat9 grams
    Carbohydrates10 grams
    Sugars4 grams
    Fiber3 grams
    Sodium410 milligrams

    Nutritional Notes:

    • Cabbage adds fiber, vitamin C, and antioxidants with minimal calories.
    • Cheese and sour cream provide calcium and protein for a satisfying richness.
    • Optional breadcrumbs add texture but can be omitted for a lower-carb version.

    Tips for Best Results

    • Drain cabbage thoroughly to avoid a watery casserole.
    • Use sharp cheddar for bolder flavor or Gruyère for a gourmet twist.
    • Substitute Greek yogurt for part of the sour cream to cut calories.
    • Make it gluten-free by skipping breadcrumbs or using gluten-free alternatives.

    Variations to Try

    • Add cooked ground beef or sausage for a heartier main dish.
    • Mix in shredded carrots or zucchini for extra color and nutrition.
    • Use pepper jack cheese for a spicy version.
    • Top with crispy fried onions instead of breadcrumbs for added crunch.

    This Cheesy Cabbage Casserole is the ultimate comfort food — creamy, cheesy, and full of flavor. It’s proof that simple ingredients can create a dish that feels both homey and indulgent. Whether you serve it as a side or make it the star of your meal, this casserole is sure to become a family favorite.

    Warm, flavorful, and easy to make, it’s everything you want in a comforting, homemade dish — and a delicious way to get everyone excited about cabbage!

  • Mediterranean-Baked Feta – A Creamy, Savory Dish Bursting with Coastal Flavors

    Mediterranean-Baked Feta – A Creamy, Savory Dish Bursting with Coastal Flavors

    If you’re looking for a dish that captures the essence of the Mediterranean in every bite, this Mediterranean-Baked Feta is the perfect choice. Warm, creamy feta cheese is baked with cherry tomatoes, olives, herbs, and a drizzle of olive oil, creating a mouthwatering appetizer or side dish that’s both simple and elegant.

    This dish combines salty, tangy, and savory flavors with just the right amount of freshness. Serve it with crusty bread, pita, or fresh vegetables — and you’ve got a restaurant-worthy dish straight from your oven.

    Ingredients

    Serves 4–6

    • 1 block (200g) feta cheese (Greek-style, full-fat preferred)
    • 1 ½ cups cherry tomatoes, halved
    • ½ cup kalamata olives, pitted and sliced
    • 2 cloves garlic, minced
    • 2 tablespoons extra virgin olive oil
    • 1 tablespoon honey (optional, for a touch of sweetness)
    • 1 teaspoon dried oregano (or 1 tablespoon fresh oregano)
    • ½ teaspoon crushed red pepper flakes (optional)
    • Freshly ground black pepper, to taste
    • 1 tablespoon fresh basil or parsley, chopped (for garnish)

    Preparation Time

    • Prep time: 10 minutes
    • Baking time: 20–25 minutes
    • Total time: 35 minutes

    Step-by-Step Instructions

    Step 1: Preheat the Oven

    1. Preheat your oven to 400°F (200°C). Lightly oil a small baking dish or cast-iron skillet.

    Step 2: Prepare the Vegetables

    1. Place cherry tomatoes, olives, and minced garlic in the dish.
    2. Drizzle with olive oil and sprinkle with oregano and pepper. Toss gently to coat.

    Step 3: Add the Feta

    1. Nestle the feta block in the center of the dish, allowing the vegetables to surround it.
    2. Drizzle a bit more olive oil on top of the feta, and add a touch of honey if you like a balance of sweet and savory.

    Step 4: Bake the Dish

    1. Place the dish in the preheated oven and bake for 20–25 minutes, or until the feta softens and begins to brown around the edges.
    2. For a golden top, switch to the broiler for the final 2 minutes of baking.

    Step 5: Garnish and Serve

    1. Remove from oven and let rest for a few minutes.
    2. Sprinkle with fresh basil or parsley before serving.

    Serving Suggestions

    • Serve warm with toasted baguette slices, pita bread, or crostini.
    • Toss the baked feta and vegetables with cooked pasta for a quick Mediterranean-inspired main course.
    • Add to grain bowls, salads, or roasted vegetables for an extra burst of flavor.
    • Pair with a glass of crisp white wine or sparkling water with lemon.

    Nutritional Highlights

    NutrientPer Serving (approx. 1/6 of recipe)
    Calories210
    Protein7 grams
    Total Fat17 grams
    Saturated Fat8 grams
    Carbohydrates6 grams
    Sugars3 grams
    Fiber1 gram
    Sodium410 milligrams

    Nutritional Notes:

    • Feta cheese provides calcium and protein while offering a tangy flavor with fewer calories than many other cheeses.
    • Olive oil adds heart-healthy monounsaturated fats.
    • Tomatoes bring antioxidants, especially lycopene, which supports skin and heart health.
    • Optional honey enhances sweetness naturally without refined sugar.

    Tips for Best Results

    • Use high-quality feta packed in brine — it melts creamier and has better flavor.
    • Add a squeeze of fresh lemon juice before serving to brighten the dish.
    • Experiment with different toppings such as roasted peppers, capers, or sun-dried tomatoes.
    • For a spicy twist, add extra red pepper flakes or a few slices of fresh chili.

    Variations to Try

    • Vegan Option: Replace feta with a plant-based feta alternative.
    • Mediterranean Pasta Bake: Stir the baked feta and vegetables into cooked penne or spaghetti.
    • Roasted Veggie Version: Add zucchini, bell peppers, or eggplant for extra texture.
    • Herb Lovers’ Twist: Use thyme, rosemary, or dill for different flavor profiles.

    This Mediterranean-Baked Feta recipe is the perfect blend of simplicity and sophistication. With minimal prep and just a few fresh ingredients, you can create a flavorful dish that feels straight out of a seaside café. Whether you’re hosting guests or making a cozy meal at home, this recipe is sure to impress.

    Rich, creamy, and bursting with Mediterranean goodness — it’s comfort food, elevated.

  • Ground Beef and Gravy Over Mashed Potatoes – The Ultimate Comfort Food Classic

    Ground Beef and Gravy Over Mashed Potatoes – The Ultimate Comfort Food Classic

    Few dishes capture the warmth of home-cooked comfort like Ground Beef and Gravy Over Mashed Potatoes. This hearty, flavorful meal combines tender ground beef simmered in rich, savory gravy, all spooned generously over creamy, buttery mashed potatoes.

    Perfect for busy weeknights or cozy weekend dinners, this recipe delivers satisfying flavors and a velvety texture in every bite — all made with simple pantry ingredients. It’s a timeless classic that brings comfort to the table with minimal effort.

    Ingredients

    Serves 4–6

    For the Ground Beef and Gravy

    • 1 pound (450g) ground beef (80/20 for best flavor)
    • 1 small onion, finely chopped
    • 2 cloves garlic, minced
    • 3 tablespoons all-purpose flour
    • 2 cups (480ml) beef broth
    • 1 tablespoon Worcestershire sauce
    • 1 teaspoon soy sauce (optional for depth)
    • ½ teaspoon black pepper
    • ½ teaspoon salt (adjust to taste)
    • 1 tablespoon butter or oil for cooking

    For the Mashed Potatoes

    • 2 pounds (900g) potatoes (Yukon Gold or Russet), peeled and cubed
    • 4 tablespoons butter
    • ½ cup (120ml) milk or cream
    • Salt and pepper to taste

    Preparation Time

    • Prep Time: 15 minutes
    • Cooking Time: 30 minutes
    • Total Time: 45 minutes

    Step-by-Step Instructions

    Step 1: Prepare the Potatoes

    1. Peel and cube the potatoes, then place them in a large pot of salted water.
    2. Bring to a boil and cook for 15–20 minutes until tender when pierced with a fork.
    3. Drain, then mash with butter and milk until smooth.
    4. Season with salt and pepper, and keep warm.

    Step 2: Brown the Ground Beef

    1. In a large skillet, melt butter over medium heat.
    2. Add chopped onion and garlic; sauté until fragrant and soft.
    3. Add ground beef and cook until browned, breaking it apart as it cooks.
    4. Drain any excess fat if needed.

    Step 3: Make the Gravy

    1. Sprinkle flour over the cooked beef and stir for 1 minute to remove the raw flour taste.
    2. Gradually whisk in the beef broth, stirring continuously to prevent lumps.
    3. Add Worcestershire sauce, soy sauce (if using), salt, and pepper.
    4. Simmer for 5–7 minutes until thickened to a gravy-like consistency.

    Step 4: Assemble the Dish

    1. Spoon a generous serving of mashed potatoes onto each plate.
    2. Pour the rich beef and gravy mixture over the top.
    3. Garnish with fresh parsley or a sprinkle of black pepper for a finishing touch.

    Serving Suggestions

    • Pair with steamed green beans, buttered corn, or a crisp garden salad for a balanced meal.
    • Serve in a bowl for a cozy “meat and potatoes” comfort dish.
    • For extra richness, top with a small dollop of sour cream or shredded cheese.

    Nutritional Highlights

    NutrientPer Serving (1 plate)
    Calories480
    Protein25 grams
    Total Fat25 grams
    Saturated Fat10 grams
    Carbohydrates38 grams
    Sugars3 grams
    Fiber3 grams
    Sodium680 milligrams

    Nutritional Notes:

    • Ground beef provides a rich source of protein and iron for energy and muscle health.
    • Potatoes offer potassium and fiber, keeping you full and nourished.
    • Butter and milk add creaminess and flavor but can be reduced for a lighter version.

    Tips for Best Results

    • For a deeper flavor, use homemade beef broth or add a splash of red wine while simmering the gravy.
    • Make ahead: The beef and gravy can be prepared a day early and reheated — the flavors intensify overnight.
    • Use instant mashed potatoes in a pinch for faster preparation.
    • Add sautéed mushrooms or peas to the gravy for extra texture and nutrition.

    Variations to Try

    • Spicy Twist: Add a pinch of chili flakes or smoked paprika for heat.
    • Cheesy Mashed Potatoes: Stir in shredded cheddar or Parmesan for a richer side.
    • Vegetarian Option: Substitute ground beef with lentils or plant-based mince and use vegetable broth.
    • Creamy Gravy Upgrade: Add a splash of heavy cream at the end of cooking for a silkier gravy texture.

    This Ground Beef and Gravy Over Mashed Potatoes recipe is comfort food at its finest — hearty, flavorful, and soul-satisfying. With tender beef, creamy potatoes, and savory gravy, every bite feels like a warm hug.

    Whether it’s for a family dinner, meal prep, or a comforting Sunday lunch, this dish delivers timeless taste and simple goodness that never goes out of style.

  • Healthy Chinese Ground Beef & Cabbage Stir Fry – A Quick and Flavorful Weeknight Meal

    Healthy Chinese Ground Beef & Cabbage Stir Fry – A Quick and Flavorful Weeknight Meal

    Here’s a complete, SEO-friendly article for Healthy Chinese Ground Beef & Cabbage Stir Fry, written in the same polished and engaging style as the previous ones — with numbered steps and a nutritional highlights table.


    Healthy Chinese Ground Beef & Cabbage Stir Fry – A Quick and Flavorful Weeknight Meal

    When it comes to easy, nutritious, and satisfying dinners, nothing beats a good stir fry. This Healthy Chinese Ground Beef & Cabbage Stir Fry delivers bold flavor and balanced nutrition in under 30 minutes. Packed with lean protein, crunchy cabbage, and a savory-sweet sauce, this dish is the perfect balance of comfort food and clean eating.

    It’s budget-friendly, meal-prep friendly, and perfect for anyone looking to add more vegetables and protein to their diet — without sacrificing taste.

    Ingredients

    Serves 4–5

    For the Stir Fry:

    • 1 pound (450g) lean ground beef (90% lean or higher)
    • 4 cups green cabbage, thinly sliced
    • 1 medium carrot, julienned
    • 1 small onion, thinly sliced
    • 3 cloves garlic, minced
    • 1 tablespoon fresh ginger, grated
    • 2 tablespoons olive oil or sesame oil

    For the Sauce:

    • 3 tablespoons low-sodium soy sauce (or tamari for gluten-free)
    • 1 tablespoon oyster sauce (optional, for depth)
    • 1 tablespoon rice vinegar
    • 1 tablespoon honey or maple syrup
    • 1 teaspoon chili paste or sriracha (optional for heat)
    • 1 teaspoon cornstarch mixed with 2 tablespoons water (for thickening)

    Garnish (optional):

    • 2 green onions, sliced
    • Sesame seeds for topping

    Preparation Time

    • Prep time: 10 minutes
    • Cooking time: 15 minutes
    • Total time: 25 minutes

    Step-by-Step Instructions

    Step 1: Prepare the Sauce

    1. In a small bowl, whisk together soy sauce, oyster sauce, rice vinegar, honey, and chili paste.
    2. Set aside while preparing the stir fry.

    Step 2: Cook the Beef

    1. Heat 1 tablespoon of oil in a large skillet or wok over medium-high heat.
    2. Add ground beef and cook until browned, breaking it apart with a spatula (about 5–6 minutes).
    3. Drain excess fat if needed and remove the cooked beef from the skillet.

    Step 3: Sauté the Vegetables

    1. Add remaining oil to the skillet.
    2. Add onion, garlic, and ginger, sautéing for 1 minute until fragrant.
    3. Stir in cabbage and carrots. Cook for 3–4 minutes until the cabbage softens slightly but still retains some crunch.

    Step 4: Combine and Finish

    1. Return the cooked beef to the skillet.
    2. Pour in the prepared sauce and stir well to coat everything evenly.
    3. Mix in the cornstarch slurry and cook for another 2–3 minutes until the sauce thickens slightly.

    Step 5: Serve

    1. Garnish with sliced green onions and sesame seeds.
    2. Serve hot over brown rice, jasmine rice, or noodles — or enjoy it as a low-carb bowl on its own.

    Serving Suggestions

    • Pair with steamed rice, quinoa, or cauliflower rice for a lighter option.
    • Wrap the mixture in lettuce leaves for an Asian-inspired lettuce wrap.
    • Add bell peppers or snap peas for extra color and crunch.
    • Double the recipe for easy meal prep lunches throughout the week.

    Nutritional Highlights

    NutrientPer Serving (approx. 1 cup)
    Calories280
    Protein25 grams
    Total Fat14 grams
    Saturated Fat4 grams
    Carbohydrates12 grams
    Sugars6 grams
    Fiber3 grams
    Sodium420 milligrams

    Nutritional Notes:

    • Cabbage adds fiber, vitamin K, and antioxidants for a nutrient-rich boost.
    • Lean ground beef provides high-quality protein and iron for sustained energy.
    • Low-sodium soy sauce helps manage salt intake without losing flavor.
    • Olive or sesame oil adds healthy fats for improved heart health.

    Tips for Best Results

    • Slice the cabbage thinly so it cooks evenly and absorbs the sauce well.
    • Use extra-lean ground beef or substitute with ground turkey or chicken for fewer calories.
    • For added spice, toss in red chili flakes or extra sriracha.
    • Stir fry quickly over high heat to maintain crisp vegetables and bold flavors.

    Variations to Try

    • Keto-friendly version: Skip the honey and serve without rice.
    • Vegetarian option: Replace beef with crumbled tofu or tempeh.
    • Teriyaki twist: Swap soy sauce and vinegar for teriyaki sauce and add pineapple chunks.
    • Extra greens: Add bok choy or spinach for more nutrients and color.

    This Healthy Chinese Ground Beef & Cabbage Stir Fry is the ultimate combination of flavor, nutrition, and simplicity. With minimal prep and everyday ingredients, you can create a restaurant-quality dish right at home in less than half an hour.

    It’s high in protein, full of vegetables, and perfect for busy weeknights when you want something wholesome and satisfying. Once you try it, it’s sure to become a staple in your dinner rotation.

  • Stir-Fried Beef and Scallions – A Quick and Flavorful Weeknight Dinner

    Stir-Fried Beef and Scallions – A Quick and Flavorful Weeknight Dinner

    If you’re craving a savory, restaurant-quality stir-fry that comes together in minutes, this Stir-Fried Beef and Scallions recipe delivers big flavor with minimal effort. Tender strips of beef are seared to perfection, then tossed with fragrant scallions and a flavorful Asian-inspired sauce.

    This dish strikes the perfect balance between richness and freshness — with caramelized beef, crisp scallions, and a glossy sauce that clings to every bite. Perfect for busy weeknights, this stir-fry pairs beautifully with rice or noodles and can be customized to suit your spice level.

    Ingredients

    Serves 4

    For the Beef Marinade:

    • 1 pound (450g) flank steak or sirloin, thinly sliced against the grain
    • 2 tablespoons soy sauce
    • 1 tablespoon cornstarch
    • 1 tablespoon rice wine or dry sherry
    • 1 teaspoon sesame oil

    For the Sauce:

    • 2 tablespoons oyster sauce
    • 1 tablespoon soy sauce
    • 1 tablespoon hoisin sauce
    • 1 teaspoon brown sugar
    • 2 tablespoons water
    • 1 teaspoon cornstarch (for thickening)

    For the Stir-Fry:

    • 2 tablespoons vegetable oil (divided)
    • 3 cloves garlic, minced
    • 1-inch piece fresh ginger, grated
    • 1 bunch scallions (about 6–8), cut into 2-inch pieces
    • Optional: 1 small red chili, sliced thin (for spice)

    Preparation Time

    • Prep time: 15 minutes
    • Marinating time: 20 minutes
    • Cooking time: 10 minutes
    • Total time: About 45 minutes

    Step-by-Step Instructions

    Step 1: Marinate the Beef

    1. In a bowl, mix soy sauce, cornstarch, rice wine, and sesame oil.
    2. Add sliced beef and toss until evenly coated.
    3. Let it marinate for 15–20 minutes to tenderize the meat.

    Step 2: Prepare the Sauce

    1. In a small bowl, whisk together oyster sauce, soy sauce, hoisin sauce, brown sugar, water, and cornstarch. Set aside.

    Step 3: Sear the Beef

    1. Heat 1 tablespoon oil in a large wok or skillet over high heat.
    2. Add marinated beef in a single layer (cook in batches if necessary).
    3. Sear for about 1–2 minutes per side until browned but not overcooked. Remove from pan and set aside.

    Step 4: Stir-Fry Aromatics

    1. Add the remaining oil to the wok.
    2. Stir in garlic, ginger, and optional chili. Cook for 30 seconds until fragrant.

    Step 5: Add Scallions and Sauce

    1. Toss in scallions and cook for about 1 minute, keeping them slightly crisp.
    2. Return the beef to the pan and pour in the prepared sauce.
    3. Stir-fry for another 1–2 minutes until the sauce thickens and coats the beef evenly.

    Step 6: Serve

    1. Serve immediately over steamed jasmine rice, fried rice, or noodles.
    2. Garnish with sesame seeds or extra scallion greens if desired.

    Serving Suggestions

    • Serve with steamed jasmine rice or garlic noodles for a complete meal.
    • Pair with a side of stir-fried bok choy or steamed broccoli for added greens.
    • For a spicy twist, add a drizzle of chili oil or sprinkle with crushed red pepper flakes before serving.
    • Great for meal prep — reheats beautifully without losing texture.

    Nutritional Highlights

    NutrientPer Serving (approx. 1 cup)
    Calories290
    Protein27 grams
    Total Fat14 grams
    Saturated Fat3 grams
    Carbohydrates10 grams
    Sugars4 grams
    Fiber1 gram
    Sodium720 milligrams

    Nutritional Notes:

    • Beef provides high-quality protein, iron, and B vitamins for sustained energy.
    • Scallions and garlic add antioxidants and natural flavor without extra calories.
    • Low in sugar and easily made gluten-free by using tamari instead of soy sauce.

    Tips for the Best Stir-Fried Beef and Scallions

    • Slice beef thinly against the grain for maximum tenderness.
    • High heat is key — it ensures the beef sears quickly without overcooking.
    • Don’t overcrowd the pan; cook in batches to keep the beef caramelized, not steamed.
    • Add scallions last to preserve their bright color and crisp texture.

    Variations to Try

    • Add bell peppers or snap peas for extra crunch and color.
    • Replace beef with chicken, tofu, or shrimp for a lighter variation.
    • For a Korean-style twist, use gochujang paste in place of hoisin sauce.
    • Sprinkle crushed peanuts or cashews for extra texture.

    This Stir-Fried Beef and Scallions recipe is the definition of quick, flavorful, and satisfying. With tender beef, vibrant scallions, and a savory-sweet sauce, it’s a dish that rivals your favorite takeout but made fresh at home.

    Whether you’re cooking for family, friends, or yourself, this easy stir-fry will become a go-to weeknight favorite — ready in under an hour and packed with bold, irresistible flavor.

  • Slow Cooker Barbequed Beef Ribs – Fall-Off-the-Bone Tender and Packed with Flavor

    Slow Cooker Barbequed Beef Ribs – Fall-Off-the-Bone Tender and Packed with Flavor

    There’s nothing quite like the rich, smoky taste of barbequed beef ribs — but spending hours over the grill isn’t always practical. With this Slow Cooker Barbequed Beef Ribs recipe, you can enjoy tender, juicy ribs that melt in your mouth, all with minimal effort.

    The slow cooker does the heavy lifting, transforming tough beef ribs into succulent perfection. Smothered in a tangy, homemade barbecue sauce, these ribs are the ultimate comfort food — perfect for weeknights, backyard gatherings, or anytime you crave authentic BBQ flavor without the fuss.

    Ingredients

    Serves 4–6

    For the Ribs:

    • 3 pounds (1.4 kg) beef short ribs or back ribs
    • 1 tablespoon olive oil
    • 1 teaspoon salt
    • 1 teaspoon black pepper
    • 1 teaspoon smoked paprika
    • 1/2 teaspoon garlic powder
    • 1/2 teaspoon onion powder

    For the Barbecue Sauce:

    • 1 cup (240ml) ketchup
    • 1/3 cup (80ml) apple cider vinegar
    • 1/4 cup (60ml) molasses or honey
    • 1/4 cup (50g) brown sugar
    • 2 tablespoons Worcestershire sauce
    • 1 tablespoon Dijon mustard
    • 1 teaspoon chili powder
    • 1/2 teaspoon liquid smoke (optional, for authentic smoky flavor)

    Preparation Time

    • Prep time: 15 minutes
    • Cooking time: 6–8 hours (on low) or 4 hours (on high)
    • Total time: Up to 8 hours 15 minutes

    Step-by-Step Instructions

    Step 1: Season the Ribs

    1. Pat the beef ribs dry with paper towels.
    2. Rub them all over with salt, pepper, smoked paprika, garlic powder, and onion powder.

    Step 2: Sear for Flavor

    1. Heat olive oil in a large skillet over medium-high heat.
    2. Sear ribs for 1–2 minutes on each side until browned. This locks in flavor and adds a rich crust.

    Step 3: Make the Sauce

    1. In a bowl, whisk together ketchup, apple cider vinegar, molasses, brown sugar, Worcestershire sauce, Dijon mustard, chili powder, and liquid smoke.

    Step 4: Slow Cook

    1. Place seared ribs into the slow cooker.
    2. Pour the sauce over the ribs, ensuring they’re evenly coated.
    3. Cover and cook on low for 6–8 hours or high for 4 hours, until the meat is tender and falling off the bone.

    Step 5: Finish and Serve

    1. Optional: Transfer ribs to a baking sheet and broil for 2–3 minutes to caramelize the sauce.
    2. Serve hot with extra sauce drizzled on top.

    Serving Suggestions

    • Serve with creamy mashed potatoes or buttered corn on the cob for a classic BBQ meal.
    • Pair with coleslaw or roasted vegetables for a lighter option.
    • Add a side of buttermilk cornbread to soak up the extra sauce.

    Nutritional Highlights

    NutrientPer Serving (Approx. 2 ribs)
    Calories480
    Protein34 grams
    Total Fat30 grams
    Saturated Fat12 grams
    Carbohydrates20 grams
    Sugars16 grams
    Fiber1 gram
    Sodium620 milligrams

    Nutritional Notes:

    • Beef ribs are rich in protein, iron, and zinc — key for energy and muscle repair.
    • The slow cooking method allows excess fat to render, resulting in tender yet lighter meat.
    • Using homemade barbecue sauce reduces sodium and processed sugar compared to store-bought options.

    Tips for Perfect Ribs

    • For deeper flavor, marinate ribs overnight in the sauce before cooking.
    • Remove any silverskin membrane from the ribs for better texture.
    • Use liquid smoke sparingly — it’s potent but enhances authentic BBQ depth.
    • For a smoky twist, finish the cooked ribs on the grill for 5 minutes per side.

    Variations to Try

    • Spicy Kick: Add 1 teaspoon of cayenne pepper or hot sauce to the barbecue sauce.
    • Sweet and Tangy: Substitute molasses with maple syrup or pineapple juice for tropical sweetness.
    • Smoky Bourbon Ribs: Stir in 2 tablespoons of bourbon for a deep, aromatic flavor.

    These Slow Cooker Barbequed Beef Ribs deliver everything you love about classic BBQ — rich, smoky flavors, fall-off-the-bone tenderness, and a finger-licking sauce — all with a fraction of the effort.

    Perfect for busy weeknights or weekend feasts, this recipe proves that great barbecue doesn’t have to come from the grill. One bite, and you’ll be hooked on the irresistible combination of sweet, smoky, and savory goodness.

  • Oreo Cheesecake Bars – Creamy, Crunchy, and Irresistibly Decadent

    Oreo Cheesecake Bars – Creamy, Crunchy, and Irresistibly Decadent

    If you love the classic combination of cookies and cream, these Oreo Cheesecake Bars are your dream dessert come true. With a buttery Oreo crust, a velvety cheesecake filling, and crunchy cookie pieces baked right in, this recipe delivers a perfectly balanced treat — rich yet not overly heavy.

    Ideal for parties, potlucks, or just a weekend indulgence, these bars are easy to make, portion perfectly, and taste like they came straight from a gourmet bakery.

    Ingredients

    Makes 12–16 bars

    For the Crust

    • 24 Oreo cookies, finely crushed
    • 1/4 cup (60g) unsalted butter, melted

    For the Cheesecake Filling

    • 16 ounces (450g) cream cheese, softened
    • 1/2 cup (100g) granulated sugar
    • 2 large eggs
    • 1/2 cup (120g) sour cream
    • 1 teaspoon vanilla extract
    • 10 Oreo cookies, roughly chopped

    Preparation Time

    • Prep time: 20 minutes
    • Baking time: 35 minutes
    • Cooling time: 2 hours
    • Total time: 2 hours 55 minutes

    Step-by-Step Instructions

    Step 1: Prepare the Crust

    1. Preheat your oven to 325°F (160°C).
    2. Line an 8×8-inch baking pan with parchment paper, leaving overhang on the sides for easy removal.
    3. In a medium bowl, mix crushed Oreos and melted butter until evenly coated.
    4. Press the mixture firmly into the bottom of the pan to form an even crust.
    5. Bake for 10 minutes, then set aside to cool slightly.

    Step 2: Make the Cheesecake Batter

    1. In a large bowl, beat cream cheese and sugar until smooth and creamy.
    2. Add eggs one at a time, mixing well after each addition.
    3. Blend in sour cream and vanilla extract until fully incorporated.

    Step 3: Add the Oreos

    1. Gently fold in the chopped Oreos, distributing them evenly through the batter.
    2. Pour the mixture over the cooled crust and smooth the top with a spatula.

    Step 4: Bake and Cool

    1. Bake for 30–35 minutes, or until the center is set but slightly jiggly.
    2. Cool completely at room temperature, then refrigerate for at least 2 hours to firm up.

    Step 5: Slice and Serve

    1. Use the parchment overhang to lift the cheesecake out of the pan.
    2. Cut into squares or bars using a sharp knife wiped clean between cuts.
    3. Serve chilled, and enjoy the creamy, crunchy perfection!

    Serving Suggestions

    • Top with whipped cream and a drizzle of chocolate or caramel sauce.
    • Serve with crushed Oreo crumbs sprinkled on top for extra texture.
    • Pair with cold milk or espresso for the ultimate dessert experience.
    • Freeze leftovers for up to 2 months — they taste like ice cream sandwiches!

    Nutritional Highlights

    NutrientPer Bar (1 of 16)
    Calories250
    Protein4 grams
    Total Fat17 grams
    Saturated Fat9 grams
    Carbohydrates23 grams
    Sugars16 grams
    Fiber1 gram
    Sodium160 milligrams

    Nutritional Notes:

    • Cream cheese adds calcium and a rich, creamy texture.
    • Oreos bring satisfying crunch and classic cookies-and-cream flavor.
    • For a lighter option, use low-fat cream cheese and Greek yogurt instead of sour cream.
    • Can be made gluten-free using gluten-free chocolate sandwich cookies.

    Tips for Perfect Oreo Cheesecake Bars

    • Always start with room-temperature cream cheese for a smooth, lump-free filling.
    • Don’t overmix the batter after adding eggs — it helps prevent cracking.
    • Chill the bars completely before slicing for clean, bakery-quality edges.
    • For extra indulgence, swirl a bit of melted chocolate into the batter before baking.

    Variations to Try

    • Mint Oreo Cheesecake Bars: Add a few drops of peppermint extract and use mint Oreos.
    • Peanut Butter Twist: Swirl in 2 tablespoons of melted peanut butter before baking.
    • Mocha Version: Add 1 teaspoon of instant espresso powder for a subtle coffee flavor.
    • No-Bake Option: Skip baking and chill the crust and filling for 4 hours instead.

    These Oreo Cheesecake Bars are the perfect fusion of creamy cheesecake and crunchy cookie bliss. Easy to prepare, visually stunning, and crowd-pleasing, they make an excellent dessert for any occasion — from casual family nights to elegant gatherings.

    Every bite is a delightful mix of smooth cheesecake and the irresistible crunch of Oreos. Make a batch today and watch them disappear in minutes!

  • Lemon Garlic Butter Chicken Bites with Savory Parmesan Linguine

    Lemon Garlic Butter Chicken Bites with Savory Parmesan Linguine

    When it comes to easy, satisfying, and flavor-packed dinners, Lemon Garlic Butter Chicken Bites with Savory Parmesan Linguine is a true standout. This dish combines juicy, golden-seared chicken bites coated in a luscious lemon garlic butter sauce with perfectly cooked linguine tossed in creamy Parmesan.

    It’s the ideal meal for busy weeknights or special occasions — quick to make, bursting with freshness, and elegantly rich without being heavy. The balance of citrus, herbs, and cheese brings restaurant-quality flavor to your kitchen in under 40 minutes.

    Ingredients

    Serves 4

    For the Chicken Bites:

    • 1½ pounds (680g) boneless, skinless chicken breasts, cut into bite-sized pieces
    • 2 tablespoons olive oil
    • 3 tablespoons unsalted butter, divided
    • 4 cloves garlic, minced
    • Zest and juice of 1 lemon
    • ½ teaspoon crushed red pepper flakes (optional)
    • 1 teaspoon Italian seasoning
    • Salt and freshly ground black pepper, to taste
    • 2 tablespoons chopped parsley, for garnish

    For the Parmesan Linguine:

    • 10 ounces (280g) linguine
    • 1 tablespoon butter
    • ½ cup (120ml) heavy cream
    • ½ cup (50g) grated Parmesan cheese
    • Salt and pepper, to taste
    • 1 teaspoon lemon juice (optional, for brightness)

    Preparation Time

    • Prep time: 15 minutes
    • Cook time: 20 minutes
    • Total time: 35 minutes

    Step-by-Step Instructions

    Step 1: Cook the Pasta

    1. Bring a large pot of salted water to a boil.
    2. Add the linguine and cook until al dente according to package directions.
    3. Drain, reserving ½ cup of the pasta water, and set aside.

    Step 2: Prepare the Chicken

    1. Pat chicken pieces dry and season with salt, pepper, and Italian seasoning.
    2. Heat olive oil in a large skillet over medium-high heat.
    3. Add chicken pieces and sear for 5–6 minutes until golden and cooked through. Remove and set aside.

    Step 3: Make the Lemon Garlic Butter Sauce

    1. In the same skillet, add 3 tablespoons of butter and minced garlic.
    2. Sauté until fragrant, about 30 seconds.
    3. Stir in lemon juice, lemon zest, and red pepper flakes.
    4. Return chicken to the skillet and toss to coat evenly in the sauce.

    Step 4: Prepare the Parmesan Linguine

    1. In a separate pan, melt 1 tablespoon butter over medium heat.
    2. Add heavy cream and bring to a gentle simmer.
    3. Stir in grated Parmesan until smooth and creamy.
    4. Add cooked linguine and toss until fully coated.
    5. If needed, add a splash of pasta water to loosen the sauce.

    Step 5: Combine and Serve

    1. Plate the Parmesan linguine and top with lemon garlic chicken bites.
    2. Garnish with chopped parsley and extra Parmesan cheese if desired.
    3. Serve warm and enjoy the burst of buttery, citrusy, and savory flavors.

    Serving Suggestions

    • Pair with a crisp Caesar salad or roasted vegetables for a complete meal.
    • Serve with garlic bread or toasted ciabatta to soak up the sauce.
    • Complement with a glass of chilled Chardonnay or sparkling water with lemon.

    Nutritional Highlights

    NutrientPer Serving (Approx. 1 Plate)
    Calories580
    Protein45 grams
    Total Fat25 grams
    Saturated Fat12 grams
    Carbohydrates45 grams
    Sugars3 grams
    Fiber3 grams
    Sodium620 milligrams

    Nutritional Notes:

    • Lean chicken breast provides high-quality protein to support muscle health.
    • Lemon and garlic contribute antioxidants and natural detoxifying compounds.
    • Parmesan and cream create rich flavor and supply calcium in moderate amounts.
    • Can be made lighter by substituting half-and-half for cream or using whole-wheat pasta.

    Tips for Best Results

    • Use freshly grated Parmesan — it melts better and gives a silkier sauce.
    • Don’t overcook the chicken; small pieces cook fast and stay juicy.
    • Add extra lemon juice or zest for a brighter flavor profile.
    • Reserve pasta water — it helps create a cohesive, creamy sauce without adding more cream.

    Variations to Try

    • Swap linguine for fettuccine or penne for texture variation.
    • Add spinach or sun-dried tomatoes for color and added nutrients.
    • For a spicy twist, toss in chili flakes or hot sauce before serving.
    • Use shrimp instead of chicken for a seafood version.

    This Lemon Garlic Butter Chicken Bites with Savory Parmesan Linguine recipe delivers the perfect combination of comfort and elegance. Tender chicken infused with buttery citrus notes meets silky Parmesan pasta for a dish that feels indulgent yet easy enough for any night of the week.

    Whether you’re cooking for family or entertaining guests, this meal promises to impress every time — delicious, satisfying, and ready in under an hour.

  • Grilled Surf and Turf Skewers with Chimichurri – A Flavor-Packed Feast for Any Occasion

    Grilled Surf and Turf Skewers with Chimichurri – A Flavor-Packed Feast for Any Occasion

    Take your grilling game to the next level with these Grilled Surf and Turf Skewers with Chimichurri — a restaurant-quality dish that combines the best of land and sea. Tender steak cubes and juicy shrimp are marinated to perfection, grilled over an open flame, and finished with a vibrant homemade chimichurri sauce bursting with fresh herbs and garlic.

    This dish is the ultimate crowd-pleaser, offering an irresistible blend of smoky, savory, and tangy flavors. Whether you’re hosting a summer cookout, a romantic dinner, or a weekend feast, these skewers deliver gourmet results with minimal effort.

    Ingredients

    Serves 4–6

    For the Skewers

    • 1 lb (450 g) sirloin or tenderloin steak, cut into 1 ½-inch cubes
    • 1 lb (450 g) large shrimp, peeled and deveined
    • 2 tablespoons olive oil
    • 1 tablespoon soy sauce
    • 1 tablespoon lemon juice
    • 2 cloves garlic, minced
    • Salt and freshly ground black pepper, to taste
    • Wooden or metal skewers

    For the Chimichurri Sauce

    • 1 cup fresh parsley, finely chopped
    • ¼ cup fresh cilantro, chopped (optional)
    • 3 cloves garlic, minced
    • ½ cup olive oil
    • 2 tablespoons red wine vinegar
    • 1 teaspoon dried oregano
    • ½ teaspoon crushed red pepper flakes
    • Salt and black pepper, to taste

    Preparation Time

    • Prep time: 20 minutes
    • Marinating time: 30 minutes
    • Grilling time: 10–12 minutes
    • Total time: About 1 hour

    Step-by-Step Instructions

    Step 1: Prepare the Marinade

    1. In a bowl, whisk together olive oil, soy sauce, lemon juice, garlic, salt, and pepper.
    2. Divide the mixture in half — one portion for the steak and one for the shrimp.

    Step 2: Marinate the Proteins

    1. Place the steak cubes in one bowl and shrimp in another.
    2. Toss to coat, cover, and refrigerate for at least 30 minutes to allow flavors to develop.

    Step 3: Prepare the Chimichurri

    1. In a small bowl, combine parsley, cilantro, garlic, olive oil, red wine vinegar, oregano, red pepper flakes, salt, and pepper.
    2. Stir well and let it sit at room temperature while you grill to allow the flavors to blend.

    Step 4: Assemble the Skewers

    1. Thread alternating pieces of steak and shrimp onto the skewers.
    2. Make sure to keep similar-sized pieces together for even cooking.

    Step 5: Grill the Skewers

    1. Preheat your grill or grill pan over medium-high heat and lightly oil the grates.
    2. Grill the skewers for about 2–3 minutes per side, turning until the steak is charred on the outside and the shrimp are pink and opaque.

    Step 6: Serve

    1. Remove the skewers from the grill and drizzle generously with chimichurri sauce.
    2. Serve immediately with extra sauce on the side for dipping.

    Serving Suggestions

    • Serve with a side of grilled vegetables, garlic butter rice, or roasted potatoes.
    • Pair with a crisp white wine or a light red like Pinot Noir for balance.
    • For a fresh contrast, add a small side salad with lemon vinaigrette.

    Nutritional Highlights

    NutrientPer Serving (approx. 2 skewers)
    Calories320
    Protein35 grams
    Total Fat18 grams
    Saturated Fat3 grams
    Carbohydrates4 grams
    Sugars1 gram
    Fiber1 gram
    Sodium310 milligrams

    Nutritional Notes:

    • High in protein from both shrimp and steak, supporting muscle repair and growth.
    • Rich in healthy fats from olive oil in the chimichurri.
    • Low in carbohydrates, making it suitable for keto and low-carb diets.
    • Packed with antioxidants from fresh herbs and garlic.

    Tips for Perfect Skewers

    • Soak wooden skewers in water for 20 minutes before grilling to prevent burning.
    • Don’t overcook the shrimp — they turn rubbery quickly, so remove as soon as they’re opaque.
    • Rest the steak for a few minutes before serving to lock in juices.
    • Make extra chimichurri — it keeps well for up to 5 days in the fridge and goes great with grilled veggies, chicken, or bread.

    Variations to Try

    • Replace shrimp with scallops or lobster chunks for an elevated version.
    • Add bell peppers, mushrooms, or onions between meat and shrimp for extra flavor.
    • Use lime juice instead of lemon for a zesty tropical twist.
    • Spice it up with extra chili flakes or jalapeño in the chimichurri.

    These Grilled Surf and Turf Skewers with Chimichurri are the perfect way to bring bold, balanced flavors to your dinner table. The combination of juicy steak, tender shrimp, and vibrant chimichurri creates a dish that’s elegant yet approachable, ideal for both weeknight meals and weekend gatherings.

    Fire up the grill, make a batch of this zesty sauce, and savor every bite of this unforgettable surf-and-turf experience!

  • Lemon-Blueberry Muffins – Soft, Zesty, and Bursting with Fresh Flavor

    Lemon-Blueberry Muffins – Soft, Zesty, and Bursting with Fresh Flavor

    If you’re looking for the perfect bakery-style treat to brighten your mornings, these Lemon-Blueberry Muffins are a must-try. Combining the refreshing tang of lemon with the sweet juiciness of blueberries, this recipe delivers soft, fluffy muffins that are bursting with flavor in every bite.

    Ideal for breakfast, brunch, or an afternoon snack, these muffins are easy to make, freezer-friendly, and taste even better the next day. The balance of citrus and fruit makes them a crowd-pleaser for all ages.

    Ingredients

    Makes 12 standard muffins

    Muffins:

    • 2 cups (250g) all-purpose flour
    • 1 tablespoon baking powder
    • 1/2 teaspoon baking soda
    • 1/4 teaspoon salt
    • 1/2 cup (115g) unsalted butter, softened
    • 3/4 cup (150g) granulated sugar
    • 2 large eggs
    • 1 cup (240ml) buttermilk (or plain yogurt)
    • 1 tablespoon lemon zest
    • 2 tablespoons lemon juice
    • 1 teaspoon vanilla extract
    • 1 1/2 cups (200g) fresh or frozen blueberries

    Optional Topping:

    • 2 tablespoons coarse sugar or granulated sugar for sprinkling

    Preparation Time

    • Prep time: 15 minutes
    • Baking time: 20–22 minutes
    • Cooling time: 10 minutes
    • Total time: Approximately 45 minutes

    Step-by-Step Instructions

    Step 1: Preheat and Prepare

    1. Preheat your oven to 375°F (190°C).
    2. Line a 12-cup muffin tin with paper liners or lightly grease with butter.

    Step 2: Combine Dry Ingredients

    1. In a medium bowl, whisk together flour, baking powder, baking soda, and salt. Set aside.

    Step 3: Cream Butter and Sugar

    1. In a large mixing bowl, beat butter and sugar until light and fluffy, about 2–3 minutes.
    2. Add eggs one at a time, beating well after each addition.

    Step 4: Add Flavor and Liquids

    1. Mix in lemon zest, lemon juice, and vanilla extract.
    2. Alternate adding the dry ingredients and buttermilk to the wet mixture, starting and ending with the dry. Mix gently until just combined—don’t overmix.

    Step 5: Fold in Blueberries

    1. Toss blueberries with a tablespoon of flour to prevent sinking, then fold them gently into the batter.

    Step 6: Fill and Bake

    1. Divide batter evenly among muffin cups, filling each about ¾ full.
    2. Sprinkle tops with coarse sugar for a bakery-style finish.
    3. Bake for 20–22 minutes, or until golden brown and a toothpick inserted in the center comes out clean.

    Step 7: Cool and Serve

    1. Let muffins cool in the pan for 5 minutes, then transfer to a wire rack to cool completely.
    2. Enjoy warm or at room temperature with a cup of tea or coffee.

    Serving Suggestions

    • Serve warm with a light spread of butter or lemon curd.
    • Pair with a yogurt parfait for a balanced breakfast.
    • For a dessert version, drizzle with a lemon glaze made from powdered sugar and lemon juice.
    • Freeze extras in an airtight container for up to 3 months — simply reheat in the oven for 5–7 minutes before serving.

    Nutritional Highlights

    NutrientPer Muffin (1 serving)
    Calories210
    Protein4 grams
    Total Fat9 grams
    Saturated Fat5 grams
    Carbohydrates29 grams
    Sugars15 grams
    Fiber2 grams
    Sodium160 milligrams

    Nutritional Notes:

    • Blueberries are rich in antioxidants and vitamin C, promoting heart and brain health.
    • Lemon adds vitamin C and a refreshing flavor with minimal calories.
    • Buttermilk creates a tender texture and adds calcium and protein.
    • Butter provides richness and helps achieve that soft crumb structure.

    Tips for Perfect Muffins

    • Don’t overmix the batter — this ensures a tender, fluffy texture.
    • Use fresh blueberries for a juicier result, but frozen berries work too (no need to thaw).
    • For a lighter version, replace half the butter with unsweetened applesauce.
    • Add a pinch of cinnamon or nutmeg for an extra depth of flavor.

    Variations to Try

    • Lemon Poppy Seed Blueberry Muffins: Add 1 tablespoon of poppy seeds for texture.
    • Glazed Muffins: Whisk 1 cup powdered sugar with 2 tablespoons lemon juice and drizzle over cooled muffins.
    • Whole Wheat Version: Substitute half the flour with whole wheat flour for extra fiber.
    • Vegan Option: Use almond milk and coconut oil, and replace eggs with flaxseed meal.

    These Lemon-Blueberry Muffins strike the perfect balance between bright citrus and sweet fruit, creating a muffin that’s both refreshing and satisfying. Whether you bake them for breakfast, brunch, or dessert, their soft texture and zesty flavor make them a timeless favorite.

    Simple, wholesome, and bursting with sunshine flavor — this recipe will quickly become a staple in your kitchen.

  • Mouthwatering Low-Carb Crack Slaw – A Quick and Flavorful Keto Stir-Fry

    Mouthwatering Low-Carb Crack Slaw – A Quick and Flavorful Keto Stir-Fry

    If you’re craving something savory, satisfying, and low in carbs, this Mouthwatering Low-Carb Crack Slaw is about to become your go-to recipe. Bursting with bold Asian-inspired flavors, this dish combines tender ground meat, crisp cabbage, and aromatic seasonings to create a healthy, comforting meal — all in under 30 minutes!

    Perfect for keto, paleo, and low-carb lifestyles, this slaw delivers big on taste without the extra carbs. It’s a great alternative to traditional stir-fry noodles and is ideal for quick weeknight dinners or meal prepping for the week ahead.

    Ingredients

    Serves 4

    • 1 lb (450g) ground beef, pork, or turkey
    • 2 tablespoons sesame oil (divided)
    • 3 cups shredded cabbage or coleslaw mix
    • 1 cup shredded carrots (optional for a touch of sweetness)
    • 3 green onions, sliced
    • 2 cloves garlic, minced
    • 1 tablespoon fresh ginger, grated
    • 2 tablespoons soy sauce (or coconut aminos for gluten-free option)
    • 1 tablespoon rice vinegar
    • 1 teaspoon sriracha or chili paste (optional, for heat)
    • 1 teaspoon sesame seeds (for garnish)
    • Salt and pepper to taste

    Preparation Time

    • Prep time: 10 minutes
    • Cooking time: 15 minutes
    • Total time: 25 minutes

    Step-by-Step Instructions

    Step 1: Cook the Meat

    1. Heat 1 tablespoon of sesame oil in a large skillet or wok over medium-high heat.
    2. Add ground meat and cook until browned, breaking it apart with a spatula. Drain excess fat if needed.

    Step 2: Add Aromatics

    1. Add minced garlic and grated ginger to the cooked meat. Sauté for 1 minute until fragrant.

    Step 3: Stir-Fry the Vegetables

    1. Add the shredded cabbage and carrots (if using) to the pan. Stir-fry for 3–5 minutes until the vegetables are tender but still crisp.

    Step 4: Add Seasonings

    1. Stir in soy sauce, rice vinegar, and sriracha. Toss well to coat evenly.
    2. Add remaining sesame oil and sliced green onions. Stir to combine.

    Step 5: Garnish and Serve

    1. Remove from heat, taste, and adjust seasoning with salt and pepper.
    2. Garnish with sesame seeds before serving.

    Serving Suggestions

    • Serve on its own for a light low-carb meal.
    • Pair with cauliflower rice for extra volume without adding carbs.
    • Add a fried egg on top for a protein boost and creamy texture.
    • Great for meal prep — it keeps well in the fridge for up to 4 days.

    Nutritional Highlights

    NutrientPer Serving (Approx. 1 ½ cups)
    Calories290
    Protein22 grams
    Total Fat20 grams
    Saturated Fat6 grams
    Carbohydrates8 grams
    Fiber3 grams
    Sugars4 grams
    Net Carbs5 grams
    Sodium520 milligrams

    Nutritional Notes:

    • High in protein and low in carbs, making it ideal for keto and low-carb diets.
    • Cabbage adds fiber and vitamins C and K.
    • Ginger and garlic provide antioxidants and anti-inflammatory benefits.
    • Healthy fats from sesame oil help boost satiety and flavor.

    Tips for Perfect Crack Slaw

    • Use ground pork or beef for a richer, heartier flavor.
    • For a spicier version, add extra sriracha or red chili flakes.
    • Replace soy sauce with tamari or coconut aminos for a gluten-free alternative.
    • Add a handful of bean sprouts or spinach for extra crunch and nutrients.
    • Store leftovers in airtight containers — it tastes even better the next day!

    Variations to Try

    • Vegetarian Option: Replace meat with crumbled tofu or tempeh.
    • Asian Fusion Twist: Add a drizzle of peanut butter or hoisin sauce for a creamy, sweet-savory balance.
    • Extra Crunch: Top with crushed peanuts or fried onions before serving.

    This Mouthwatering Low-Carb Crack Slaw is the ultimate one-pan wonder — fast, flavorful, and incredibly satisfying. It’s a perfect example of how healthy eating doesn’t have to be boring or complicated.

    Whether you’re following a keto plan, reducing carbs, or simply looking for a quick dinner packed with flavor, this easy slaw will become a staple in your kitchen.

    Enjoy it hot, fresh, and straight from the skillet — comfort food has never been this guilt-free!

  • Coconut Macaroons – Chewy, Golden, and Naturally Sweet Treats

    Coconut Macaroons – Chewy, Golden, and Naturally Sweet Treats

    If you love desserts that strike the perfect balance between chewy and crisp, Coconut Macaroons are a timeless delight you’ll want to bake again and again. These golden, bite-sized treats are rich with coconut flavor, lightly sweetened, and irresistibly tender on the inside.

    Whether you serve them as a teatime snack, a holiday cookie, or a gluten-free dessert option, this easy recipe captures bakery-quality results right from your kitchen. Plus, they store beautifully — making them perfect for meal prep or gifting.

    Ingredients

    Makes about 20 macaroons

    • 3 cups (240g) sweetened shredded coconut
    • 2/3 cup (130g) granulated sugar
    • 4 large egg whites
    • 1 teaspoon vanilla extract (or almond extract for variation)
    • Pinch of salt
    • Optional: 1/2 cup (90g) semi-sweet chocolate chips for dipping or drizzling

    Preparation Time

    • Prep time: 10 minutes
    • Baking time: 20 minutes
    • Cooling time: 15 minutes
    • Total time: 45 minutes

    Step-by-Step Instructions

    Step 1: Preheat and Prepare

    1. Preheat your oven to 325°F (160°C).
    2. Line two baking sheets with parchment paper or silicone baking mats.

    Step 2: Mix the Batter

    1. In a large bowl, combine shredded coconut, sugar, and salt.
    2. Add egg whites and vanilla extract, mixing until the coconut is evenly coated and sticky.

    Step 3: Shape the Macaroons

    1. Using a tablespoon or small cookie scoop, form mounds of the coconut mixture onto the baking sheets, spacing them about 1 inch apart.
    2. Compact gently with your fingers to prevent them from falling apart while baking.

    Step 4: Bake

    1. Bake for 18–22 minutes, or until the tops turn golden brown and the edges are crisp.
    2. Remove from the oven and let cool completely on the tray before transferring to a wire rack.

    Step 5: Optional Chocolate Dip

    1. Melt chocolate chips in a microwave-safe bowl in 20-second intervals, stirring in between.
    2. Dip the bottoms of cooled macaroons into the melted chocolate or drizzle chocolate on top.
    3. Place on parchment to set before serving.

    Serving Suggestions

    • Pair with coffee or hot chocolate for a cozy afternoon treat.
    • Dip half of each macaroon in dark chocolate for a rich twist.
    • Serve with fresh fruit or whipped cream for a light dessert.
    • Pack in decorative tins for homemade gifts during holidays or special occasions.

    Nutritional Highlights

    NutrientPer Serving (1 macaroon)
    Calories110
    Protein2 grams
    Total Fat6 grams
    Saturated Fat5 grams
    Carbohydrates12 grams
    Sugars10 grams
    Fiber1 gram
    Sodium35 milligrams

    Nutritional Notes:

    • Coconut provides healthy fats and a dose of dietary fiber.
    • Egg whites add light protein and help bind the mixture naturally.
    • Chocolate drizzle boosts flavor — dark chocolate adds antioxidants and richness.
    • Naturally gluten-free and can easily be made dairy-free.

    Tips for Perfect Coconut Macaroons

    • For a crispier exterior, bake a few minutes longer and let them cool completely before storing.
    • To make them extra chewy, slightly underbake and store in an airtight container.
    • If your mixture feels too dry, add 1 tablespoon of condensed milk for extra moisture.
    • Always let them cool fully before dipping in chocolate to avoid melting.

    Variations to Try

    • Add lemon zest or orange extract for a citrusy twist.
    • Mix in chopped nuts or dried cranberries for extra texture.
    • Replace sugar with coconut sugar or honey for a natural sweetener option.
    • Use unsweetened coconut flakes and increase sugar slightly for a lighter sweetness profile.

    These Coconut Macaroons are the perfect marriage of chewy and crisp textures, packed with natural coconut flavor and just the right touch of sweetness. They’re quick to prepare, visually stunning, and endlessly customizable — ideal for holidays, dessert platters, or everyday indulgence.

    Once you try them, they’ll become a staple in your baking rotation — proof that simple ingredients can create truly extraordinary treats.

  • Pumpkin Cinnamon Roll Muffins – The Ultimate Fall-Inspired Treat

    Pumpkin Cinnamon Roll Muffins – The Ultimate Fall-Inspired Treat

    If autumn had a flavor, it would taste just like these Pumpkin Cinnamon Roll Muffins. Soft, fluffy, and bursting with cozy spices, these muffins combine the comforting taste of pumpkin with the swirl and sweetness of a classic cinnamon roll. Perfect for breakfast, brunch, or a seasonal dessert, they’re the ideal blend of warmth, sweetness, and nostalgia.

    Made with real pumpkin puree, fragrant cinnamon, and a hint of vanilla glaze, these muffins fill your kitchen with an irresistible aroma that feels like a hug from fall itself.

    Ingredients

    Makes 12 muffins

    Muffin Batter:

    • 1 ¾ cups (220g) all-purpose flour
    • 1 teaspoon baking powder
    • ½ teaspoon baking soda
    • ½ teaspoon salt
    • 1 teaspoon ground cinnamon
    • ½ teaspoon ground nutmeg
    • ¼ teaspoon ground ginger
    • ½ cup (100g) brown sugar
    • ½ cup (115g) granulated sugar
    • ½ cup (120ml) vegetable oil (or melted butter)
    • 2 large eggs
    • 1 cup (240g) pumpkin puree (not pumpkin pie filling)
    • 1 teaspoon vanilla extract

    Cinnamon Swirl Filling:

    • ¼ cup (50g) brown sugar
    • 1 tablespoon ground cinnamon
    • 2 tablespoons melted butter

    Vanilla Glaze (optional):

    • ½ cup (60g) powdered sugar
    • 1 tablespoon milk
    • ½ teaspoon vanilla extract

    Preparation Time

    • Prep time: 15 minutes
    • Bake time: 20–22 minutes
    • Cooling and glazing: 10 minutes
    • Total time: About 45 minutes

    Step-by-Step Instructions

    Step 1: Prepare the Oven and Pan

    1. Preheat your oven to 350°F (175°C).
    2. Line a 12-cup muffin tin with paper liners or lightly grease with cooking spray.

    Step 2: Mix the Dry Ingredients

    1. In a large bowl, whisk together flour, baking powder, baking soda, salt, cinnamon, nutmeg, and ginger.

    Step 3: Combine the Wet Ingredients

    1. In a separate bowl, mix together brown sugar, granulated sugar, oil, eggs, pumpkin puree, and vanilla until smooth and well blended.

    Step 4: Combine Wet and Dry

    1. Gradually add the dry ingredients to the wet mixture and stir until just combined — do not overmix to keep the muffins soft.

    Step 5: Create the Cinnamon Swirl

    1. In a small bowl, combine brown sugar, cinnamon, and melted butter to make the swirl mixture.
    2. Fill each muffin cup halfway with batter, add a small spoonful of the cinnamon mixture, then top with more batter. Swirl gently with a toothpick.

    Step 6: Bake

    1. Bake for 20–22 minutes or until a toothpick inserted in the center comes out clean.
    2. Let muffins cool in the pan for 5 minutes, then transfer to a wire rack.

    Step 7: Glaze and Serve

    1. Whisk together powdered sugar, milk, and vanilla until smooth.
    2. Drizzle the glaze over cooled muffins before serving.

    Serving Suggestions

    • Enjoy warm with a drizzle of cream cheese frosting for an extra indulgent touch.
    • Pair with a pumpkin spice latte or hot apple cider for the perfect fall treat.
    • Serve at brunches, bake sales, or as a cozy dessert for family gatherings.

    Nutritional Highlights

    NutrientPer Serving (1 Muffin)
    Calories240
    Protein4 grams
    Total Fat10 grams
    Saturated Fat2 grams
    Carbohydrates34 grams
    Sugars18 grams
    Fiber2 grams
    Sodium150 milligrams

    Nutritional Notes:

    • Pumpkin puree provides fiber, beta-carotene, and vitamin A for eye and immune health.
    • Cinnamon and nutmeg offer antioxidants and warmth without adding calories.
    • Can be made dairy-free by using plant-based milk and oil instead of butter.

    Tips for Best Results

    • Use pure pumpkin puree for natural flavor and moisture — not canned pumpkin pie mix.
    • Don’t overmix the batter to keep the muffins light and tender.
    • Add chopped nuts or chocolate chips for extra texture and flavor.
    • Store muffins in an airtight container at room temperature for up to 3 days or freeze for up to 2 months.

    Variations to Try

    • Cream Cheese Swirl: Add a spoonful of sweetened cream cheese to the center before baking.
    • Gluten-Free Version: Substitute flour with a 1:1 gluten-free baking blend.
    • Healthier Option: Replace half the oil with unsweetened applesauce.
    • Mini Muffins: Bake for 12–14 minutes for bite-sized treats perfect for snacking.

    These Pumpkin Cinnamon Roll Muffins combine the best of two comfort food classics — the rich, spiced aroma of pumpkin and the gooey sweetness of cinnamon rolls. They’re fluffy, flavorful, and beautifully glazed, making them the ultimate fall indulgence.

    Whether you’re baking for a cozy breakfast or a special weekend treat, these muffins bring the warmth of autumn straight to your table — one delicious bite at a time.

  • Easy Dump and Bake Meatball Casserole – The Ultimate Comfort Food for Busy Nights

    Easy Dump and Bake Meatball Casserole – The Ultimate Comfort Food for Busy Nights

    If you’re looking for a hearty, no-fuss dinner that tastes like it’s been simmering all day, this Dump and Bake Meatball Casserole is your new go-to recipe. With just a handful of ingredients, no pre-cooking, and minimal cleanup, this dish delivers all the cozy flavors of homemade Italian comfort food — with almost zero effort.

    Perfect for busy weeknights or lazy weekends, this recipe combines juicy meatballs, tender pasta, rich marinara sauce, and gooey melted cheese — all baked to perfection in a single dish.

    Ingredients

    Serves 6–8

    • 1 (24 oz / 680g) jar marinara sauce
    • 3 cups (720ml) water
    • 1 pound (450g) frozen or homemade meatballs
    • 2 cups (200g) uncooked penne or rotini pasta
    • 1 teaspoon Italian seasoning
    • 1/2 teaspoon garlic powder
    • 1 1/2 cups (170g) shredded mozzarella cheese
    • 1/4 cup (25g) grated Parmesan cheese
    • Fresh basil or parsley for garnish (optional)

    Preparation Time

    • Prep time: 10 minutes
    • Baking time: 45 minutes
    • Total time: 55 minutes

    Step-by-Step Instructions

    Step 1: Preheat the Oven

    1. Preheat your oven to 400°F (200°C) and lightly grease a large baking dish (about 9×13 inches).

    Step 2: Combine Ingredients

    1. In the baking dish, add uncooked pasta, frozen meatballs, marinara sauce, water, Italian seasoning, and garlic powder.
    2. Stir gently until the pasta is evenly coated and the meatballs are distributed.

    Step 3: Bake the Casserole

    1. Cover the dish tightly with aluminum foil to trap steam, which helps the pasta cook evenly.
    2. Bake for 35 minutes.

    Step 4: Add Cheese and Finish Baking

    1. Remove the foil, stir the casserole, and sprinkle mozzarella and Parmesan cheese evenly over the top.
    2. Return to the oven, uncovered, and bake for 10 more minutes, or until the cheese is melted and bubbly.

    Step 5: Serve and Enjoy

    1. Let the casserole rest for 5 minutes before serving.
    2. Garnish with chopped basil or parsley for a fresh finish.

    Serving Suggestions

    • Pair with a simple green salad or garlic bread for a complete meal.
    • Add sautéed vegetables like mushrooms or bell peppers for extra nutrition.
    • For spice lovers, sprinkle with red pepper flakes before serving.

    Nutritional Highlights

    NutrientPer Serving (1 cup)
    Calories410
    Protein22 grams
    Total Fat17 grams
    Saturated Fat7 grams
    Carbohydrates42 grams
    Sugars7 grams
    Fiber4 grams
    Sodium710 milligrams

    Nutritional Notes:

    • High in protein from meatballs and cheese for lasting fullness.
    • Balanced carbs and fats provide steady energy.
    • Tomato-based sauce adds antioxidants like lycopene for heart health.
    • Swap whole wheat pasta for extra fiber or use low-fat cheese to reduce calories.

    Tips for Best Results

    • Don’t skip the foil during the first bake — it’s key for tender pasta.
    • If using homemade meatballs, pre-cook them for added flavor.
    • For extra creaminess, stir in 1/4 cup of ricotta or cream cheese before adding mozzarella.
    • This casserole also freezes beautifully — perfect for meal prep!

    Variations to Try

    • Spicy Meatball Casserole: Add sliced jalapeños or spicy sausage.
    • Vegetarian Version: Use plant-based meatballs and veggie marinara.
    • Cheesy Upgrade: Mix in shredded cheddar or provolone for richer flavor.
    • Mediterranean Twist: Add olives, artichokes, and feta for a bright, tangy contrast.

    The Dump and Bake Meatball Casserole is the definition of comfort made easy. With no need for boiling pasta or pre-cooking meatballs, this one-pan wonder saves time without sacrificing flavor. It’s family-friendly, freezer-friendly, and sure to become a weeknight favorite.

    Whether you’re feeding a crowd or looking for an effortless dinner that delivers maximum satisfaction, this recipe hits the spot — every single time.